Thursday, October 28, 2010

Funky Cosmetic Bags

Time is flying by as the most wonderful time of the year is approaching.. or is it already here?
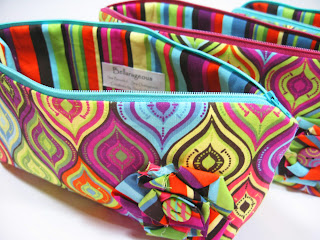
Recently our church had their annual fall men's retreat, so my sister and I were both without our husbands for 3 days and 2 nights. Here in the big city, that can be kind of creepy! So we each had the girls of our class over for a sleepover. My sister wanted to give each of her teenage girls a cosmetic bag as a gift. She chose the fabrics, and here is what I came up with!
I had to make eight of them! Each of them had a shabby chic flower with a coordinating button as the center.


The interior was a fun stripe


A tab on the side makes carrying it easier


A lot of work, but the teenagers loved them! Their smiles were well worth the effort! Now I just have to find the time to make one for myself....


Saturday, October 9, 2010

Name That Style!

I am very excited about the new bag I just finished.. but I have a problem! I cannot seem to come up with a name or title for it that describes its style. The exterior is a soft suedecloth material with a pattern that's earthy and organic with leaves and vines. The colors are deep and rich reds, greens, and creams. The interior of the bag has the same color scheme, but the pattern is much more modern. I know there's a style with that casual, rural, country or vintage almost look, combined with the modern, but I can't seem to put a name to it! When you see this bag, what would you describe its style as?
I need a title!!!


Tuesday, October 5, 2010

Marketing Handmade Items this Holiday Season


Fall has arrived, and winter will soon be approaching. The promise of joyous holidays spent with family and friends awaits, and people everywhere are pulling out their warm clothes and mugs of hot apple cider. This time of the year is busy, and gift giving is one every one's mind. Everyone wants to find that perfect gift for each person; something unique, different, and screams "I put time into this gift." However, the reality of the economy this year has left every in a deal-seeking mood. This is both a perfect opportunity, and a tremendous challenge to every artist that creates handmade things. Whether you've been in a business for awhile, or toying with the idea of possibly marketing that item you make that everyone always says, "You should totally try to sell that!", pricing, marketing, and finding a balance between perceived and actual value can definitely be a challenge. Don't be overwhelmed! There's a bounty of advice available from people who have been there, done that, and succeeded as well as failed. Don't fear failure; failure is how you learn! At least that's what I tell myself every day!

I wanted to share a link with you. It has a wealth of information, tips, and instruction for marketing, pricing, and running your own handmade business. Because face it: we all want to design, create, and inspire others, but few want to market, price, promote, and manage the business aspect of things. I know I don't! But reality has reared it's ugly head, and we had better get on top of things now! This time of year brims with people wanting and willing to spend money; so get on top of your marketing strategy, develop product lines they will want to buy, and make some money this holiday season! It is possible.

I had a difficult time choosing specific topics, so here is the link for the marketing page; I recommend reading as much as you can!
CLICK HERE

Monday, October 4, 2010

Round-Up Sunday Project #1

This Sunday at our church we had our annual "Round-Up Sunday." This is a Western themed Sunday we have every fall to "round-up" all the people who may have strayed over the summer due to vacations, heat, etc. It's a fun day had by all with everyone dressed up, a big cowboy style dinner, and games for the kids. I especially love seeing all the little kids dressed up like cowboys and cowgirls!
One of my good friends had a little girl in January wanted a dress for her, but couldn't find one anywhere, so I offered to make one!


This little pillowcase dress is what I came up with in the short time I had! 

This cute navy blue western paisley patterned fabric made up the body of the dress, and I finished it off with an eyelet lace and red paisley ribbon.


Red ribbon with a white stitching design became the ties on the shoulders.


I couldn't stop there! I used some of the red ribbon to make a headband, and some fabric and ribbon scraps to make a matching flower.  Little Ellie looked adorable on Sunday! And I'm still kicking myself for forgetting my camera!

Saturday, September 25, 2010

Fall Preview - Canvas Satchel

Fall has finally arrived!! Here in the Arizona desert, the temperatures haven't cooled down yet; leaves aren't changing, and it still feels like summer! However, this has not dampened my spirits! I am just excited about fall as if I could walk outside and see the trees putting on their coats of red and gold, and feel the brisk air! Okay, that was kind of poetic, so moving on!

This large canvas satchel is another bag I designed and created! The colors and pattern of the fabric reminds me of fall, and the large size makes me want to load up my coupons and lists, and head to do some early Christmas shopping!

The bag is made out of a sturdy canvas upholstery material, and features large wooden handles, grommets on the side tied with a suede cord, pleated design on the front and back, large shape, and a zipper and open pocket on the inside!


Friday, August 20, 2010

Tea Rose Home Giveaway

I'm very excited to share this fantastic giveaway with you! Tea Rose Home is a wonnnderful blog that I have so enjoyed reading! I highly recommend you check out her blog! Sachiko is celebrating her 2 year blogging anniversary, and Amy Butler Designs is giving her 5 patterns for a giveaway to celebrate!! Head over HERE to enter this great giveaway! Good luck!

Tuesday, August 17, 2010

Tutorial Tuesday - Long Stemmed Fabric Flowers

I have a very cute tutorial to share with you today! We can thank a lovely blog called Snowy Bliss for this great tutorial! I can't wait to add a vase of these flowers to my house!


Go HERE to see this tutorial, and add some of these beautiful flowers to your home!


Saturday, August 14, 2010

New Item! Brown and Green Slouchy Bag

I finally got this bag out of my system! I've had this design in my head for a long time, and I'm so excited to have it finished! I just love the style and colors of this bag!

The slouchy, gathered looked of the bag is flirty and casual, but combined with the belt and print of the fabrics, the bag definately has a sophisticated air about it! I thought up this design, and I'm very happy with how roomy it is on the inside! Since I carry "everything but the kitchen sink" in my bags, this one is great for those who have the same "Heavy Bag Disorder" as me!

Head to my shop to check it out! I would love your feedback and value what you think about the bag! As always, feel free to convo me with a custom order!

Friday, August 13, 2010

Featured Seller Friday - CoCo Rose Couture

Our first Featured Seller Friday is here! I am very happy to introduce you to a lovely shop: CoCo Rose Couture


Bree makes gorgeous flower accessories! From necklaces and flower rosettes to headbands and hair clips!


CoCo Rose Couture is a little touch of vintage mixed with modern elements. Everything in her shop is inspired by a color! She adores color and loves reinventing old items for the modern day. She trys to make her products as eco friendly and upcycled as possible and loves finding unique fabrics from vintage stores and using them in her bib necklaces and headbands. She then feels that the piece has a history, a story,some whimsy


All of her headbands fit 3 month olds up to adult women-if you need a headband for a newborn she can adjust the size. If you would like a headband on a hard band instead of the elastic type just convo her for a custom listing.

So visit CoCo Rose Couture and add a touch of beauty and whimsy to your life!


Tuesday, August 10, 2010

Tutorial Tuesday - Heirloom Cut Chenille Baby Blanket

TUTORIAL TUESDAY: My favorite blog day of the week!! I am totally in love with tutorials! I found this tutorial this past weekend and could hardly wait until today to share it! This baby blanket is simply gorgeous, and is made differently than you expect! 

The creator of this beautiful blanket is Anneliese at Aesthetic Nest . She has an amazing blog that I highly recommend you check out!

Go HERE to see this awesome tutorial! If you do this project, please share your photos and experiences! I am definitely planning to make this in the future, and would love your input!

Friday, August 6, 2010

Featured Seller Friday

It's Friday!! Every one's favorite day of the week! For most, the week's work is finished, the stress is diminished, and weekend plans have arrived! Whether it's just relaxing, doing things around the house, camping, vacationing, browsing through craft shows, antique shops, thrift stores, spending time with family, or whatever you may fill your weekends with, it is a much anticipated time for everyone!

To celebrate Fridays, we are going to feature a new seller every week! What's a better way to finish out your week than being featured, or getting introduced to a new creative person, and getting inspired by their items?!

Enter to be featured by leaving a comment on my blog including the following:
  • Etsy web address
  • Favorite items to be featured
  • Email address
I will feature some pictures of your work, introduce you by choosing part of your profile bio unless otherwise indicated, and include any promotion you may be offering.  Sellers will be chosen in the order comments are received.

So make Friday even better!! Leave a comment to be featured, and visit every week to meet fellow sellers!

Tuesday, August 3, 2010

Tutorial Tuesday

Tutorial Tuesday is here and I have an awesome tutorial to share with you! Realynn is an amazing blog that featured an incredibly creative tutorial this week!!


10 Minute Skirt Tutorial

This adorable skirt is made out of a window valance! Super cute, creative, and my favorite: made out of recycled materials!


Go HERE to see the full tutorial and learn how you can make a skirt like this yourself!


Monday, August 2, 2010

Monday Mail Call

I was super excited to visit my mailbox Saturday night - my Etsy order arrived!!

I bought a darling little compact mirror from LauraliLarson that featured vintage sheet music! Since I'm a pianist, I instantly fell in love!

LauraliLarson is a wonderful seller with an adorable shop! She shipped promptly and even included a free gift!

I was thrilled when I opened my package and saw my purchase sweetly and simply wrapped. It made my purchase even more special! I was even more excited when I opened the package and realized she had included a free gift!!

This ring is so cute!


Visit LauraliLarson and indulge yourself in a special gift for you, or anyone else!


Saturday, July 31, 2010

Saturday Shopping Finds


Saturday's are my favorite day to spend scrounging around thrift stores for things that seem useless and invaluable, but just need some TLC! The quote "One man's trash is another man's treasure" is definitely true! I can't wait to share what I found today!

I found two of these napkins that are 19" square


4 of these place mats that are 18" x 12"


And two 50" cuts of this cute Waverly material!


I have some ideas in my head of what I could make out of these, but feel free to share any ideas you may have! Sharing creativity is what blogging is all about!
I will post the finished product that used each of these items of material as soon as I have them finished!

Thursday, July 29, 2010

Minnie Mouse Pillowcase Dress


My sweet little niece turned 3 years old this month! Since she is enamored with Minnie Mouse, I wanted to make something special for her birthday party!


This was my first try making a pillowcase dress.. well, actually at making children's clothes in general! I was thrilled with how it turned out!! As cute as it is, nothing compared with seeing the look on her face when I gave it to her!

If anyone would be interested in a tutorial of this dress pattern, leave a comment and I will make one!

Tuesday, July 27, 2010

Buttons and Badges/My Button Boutique Giveaway


I found a great giveaway today that I wanted to share! These buttons and badges are adddoooorable! I can only imagine how cute they would be as the centers of my recent obsession: Fabric flowers!!  The crafting possibilities with these buttons are endless!


Enter for a chance to win one of these wonderful items! Instructions and further info at the blog of Someday Crafts

Go HERE to enter to win!

Wednesday, June 30, 2010

Button Clock Tutorial

My first creative project for my sewing room is finished! I found a large decorative red button at JoAnn, and as cute as it was on its own, I wanted to add something more! I really needed a clock in my sewing room, and I figured this would be perfect!
This tutorial will share how I turned this button into a clock, but if you can't find a button, there's plenty of other creative options! There's always lots of fun things in the wood crafting section of your local craft store; with some paint, fabric, and a clock kit, the options are limitless!

First I bought the large red button (about 12" across) from JoAnn Fabrics and Crafts,  and a standard clock kit from Michaels.  I apologize for forgetting to take a picture of the supplies before I started.

First, measure the size of the cylinder on the clock that needs to pop through. I started out small, and drilled it out until the hole was large enough.

Then I drilled the hole. I actually took the picture in my sewing room, but drilled the hole in my garage because I didn't really want a mess all over my sewing counter! (Sorry the picture won't flip; I drilled it flat)


Then I inserted the clock mechanism. However, because of the holes in my button, you could see the clock mechanism through the holes.


So I found a piece of paper that matched my wall color, cut out a hole in the center the same size as the hole I drilled, and taped it on to the back.


Now when you look at the button on the wall, you don't see the clock mechanism, and it looks like it's hanging right on the wall.


I then inserted the clock mechanism and attached the hands.


Simply add a battery and it's finished! 


I can't wait to see what it will look like on my wall!


This really was a quick and easy project! With some creativity and a few tools, you too can make this clock or something similar. Don't settle for an ordinary clock in your creative space, make something beautiful and outrageous!